Saturday, December 24, 2022

Spice Up Your Summer with this Delicious Spicy Margarita Recipe

Spicy Margarita Recipe

Spicy margaritas are the perfect summer cocktail, combining the refreshing flavors of a traditional margarita with a spicy kick. Whether you're lounging by the pool or hosting a summer BBQ, this spicy margarita recipe is sure to be a hit.

Spicy Margarita Recipe

Ingredients:

  • 1.5 ounces tequila
  • 1 ounce triple sec
  • 1/2 ounce lime juice
  • 1/2 ounce simple syrup
  • 1/4 teaspoon cayenne pepper
  • 1/4 teaspoon chili powder
  • Kosher salt, for rimming the glass
  • Lime wedges, for rimming the glass
  • Ice
  • Jalapeno slices, for garnish (optional)

Instructions:

  1. To make the spicy margarita, start by rimming the glass. Place a small plate with kosher salt on it next to the glass. Wet the rim of the glass with a lime wedge and then dip the rim into the salt to coat it evenly.
  2. Next, fill a shaker with ice and add the tequila, triple sec, lime juice, simple syrup, cayenne pepper, and chili powder. Shake until well combined and chilled.
  3. Strain the mixture into the prepared glass filled with ice. Garnish with jalapeno slices, if desired, and serve immediately.

This spicy margarita is the perfect blend of sweet and spicy, and is sure to be a hit at any summer gathering. For an extra touch of flavor, you can also try adding a splash of orange juice or grapefruit juice to the mix. And if you prefer a sweeter margarita, simply adjust the amount of simple syrup to taste.

Whether you're a fan of spicy drinks or just looking for a refreshing summer cocktail, this spicy margarita recipe is sure to be a hit. So grab your shaker and get mixing!

Friday, December 23, 2022

Lemon Tart Recipe: A Deliciously Tangy Dessert

Lemon Tart Recipe: A Deliciously Tangy Dessert

Lemon tart is a classic and delicious dessert that is perfect for any occasion. With its creamy, tangy filling and buttery crust, this recipe is sure to become a new favorite.

Lemon Tart Recipe: A Deliciously Tangy Dessert


Ingredients:

  • 1 cup all-purpose flour
  • 1/2 cup unsalted butter, softened
  • 1/4 cup granulated sugar
  • 1 large egg yolk
  • 1/2 teaspoon vanilla extract
  • 2 tablespoons cold water
  • 3/4 cup granulated sugar
  • 3 large eggs
  • 1/2 cup lemon juice
  • 1/4 cup heavy cream
  • Zest of 1 lemon

Instructions:

  1. To make the crust, preheat your oven to 350°F and grease a 9-inch tart pan with a removable bottom. In a medium bowl, combine the flour, butter, and 1/4 cup of sugar until the mixture resembles fine crumbs. Add the egg yolk, vanilla extract, and cold water, and mix until the dough comes together. Press the dough evenly into the bottom and up the sides of the prepared pan. Prick the bottom of the crust all over with a fork, then bake for 15-20 minutes, or until the crust is lightly golden.
  2. While the crust is baking, make the filling. In a medium bowl, whisk together the 3/4 cup of sugar, eggs, lemon juice, heavy cream, and lemon zest until well combined. Pour the filling into the warm crust and bake for an additional 20-25 minutes, or until the filling is set.
  3. Allow the tart to cool completely, then refrigerate for at least 2 hours before serving. Serve the tart chilled, garnished with whipped cream or additional lemon zest, if desired.

This delicious lemon tart is the perfect balance of tangy and sweet, and is sure to become a new favorite dessert. Whether you serve it as a special treat for a dinner party or as an indulgence for yourself, this recipe is sure to satisfy your sweet tooth.

For an extra special touch, you can also top the tart with fresh fruit, such as sliced strawberries or blueberries. If you're feeling adventurous, you can also try adding a layer of fruit compote or preserve in between the crust and the filling for an extra burst of flavor.

This lemon tart recipe is a great starting point, but feel free to get creative and make it your own. You can use different types of crust, such as a graham cracker crust or a shortbread crust, or experiment with different types of sweeteners or flavorings. The possibilities are endless, so have fun and let your culinary creativity shine!

Thursday, December 22, 2022

Perfect Summer Dessert: Grilled Peaches with Vanilla Bean Ice Cream

Grilled Peaches with Vanilla Bean Ice Cream Recipe

Welcome back to Tasting Treats, the food and cooking blog that brings you delicious recipes and inspiration for every occasion.

Grilled Peaches with Vanilla Bean Ice Cream Recipe


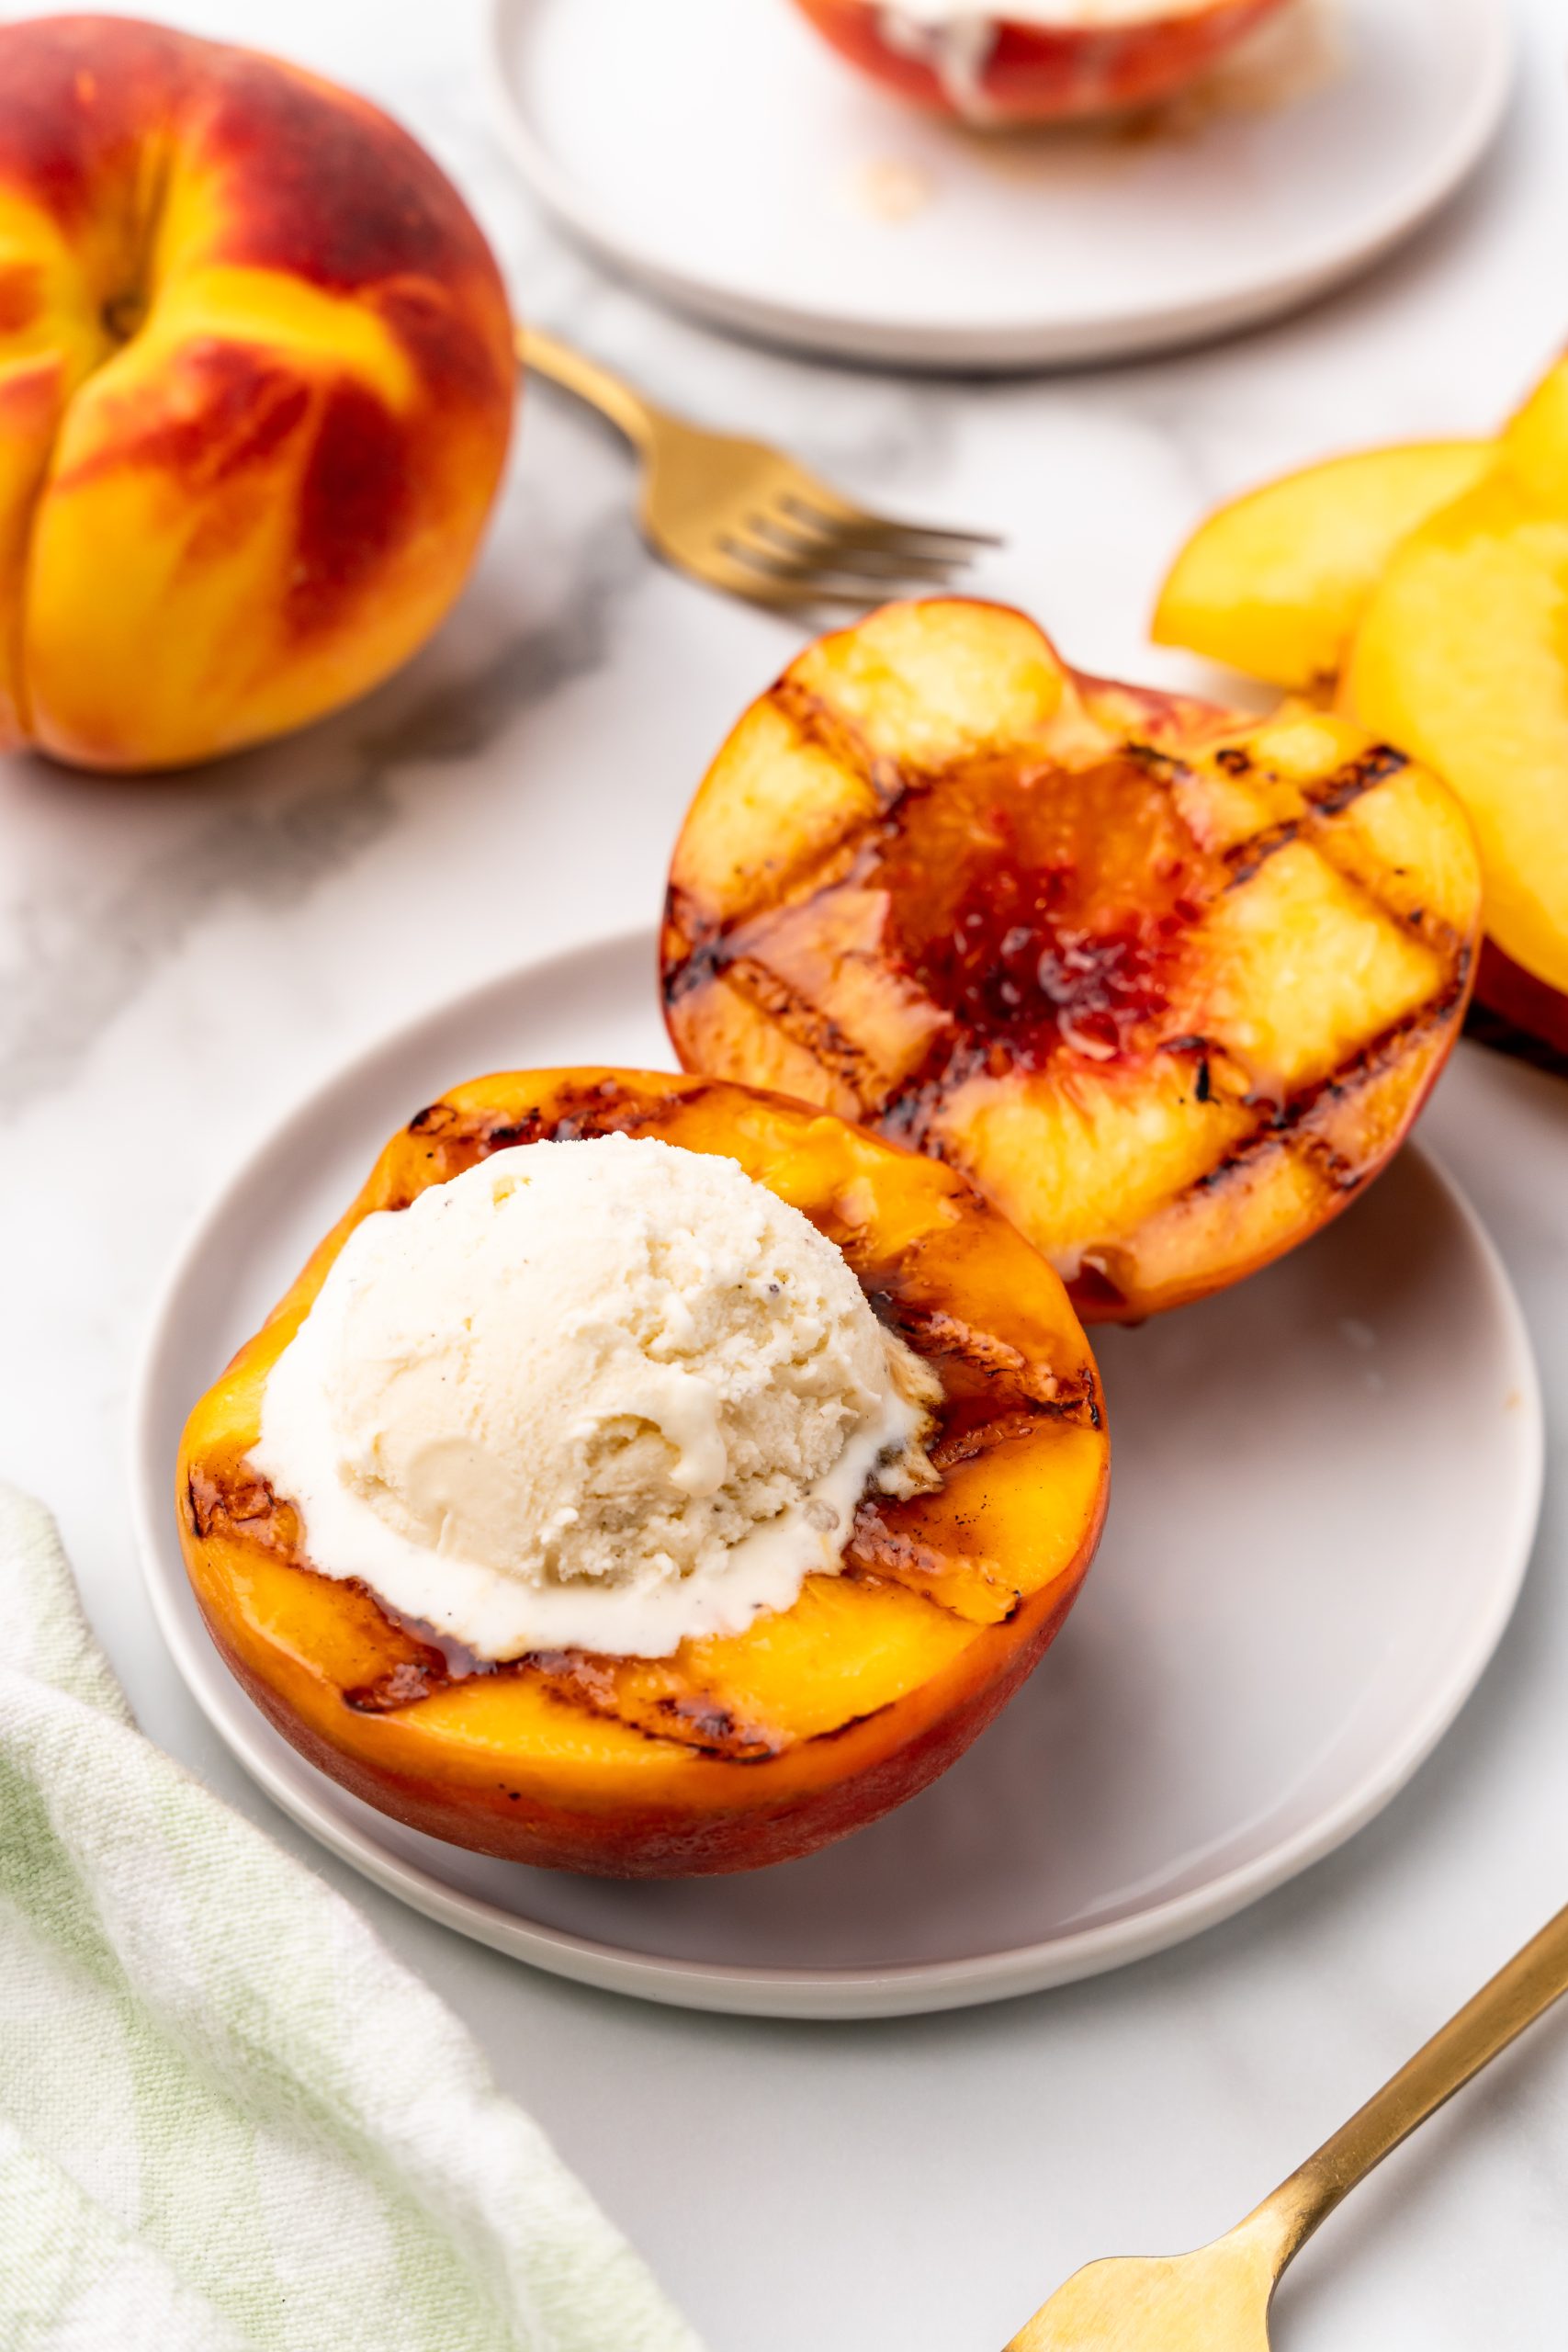
Today, we're excited to share with you a recipe for a summery dessert that's perfect for grilling season: grilled peaches with vanilla bean ice cream. Juicy, sweet peaches are grilled to perfection and served with a scoop of creamy vanilla bean ice cream. It's the perfect way to end a summer meal.

Ingredients:

  • 4 peaches, halved and pitted
  • 2 tbsp butter, melted
  • 1/4 cup brown sugar
  • 1 tsp cinnamon
  • 1 pint vanilla bean ice cream

Instructions:

  1. Preheat your grill to medium-high heat.
  2. Brush the cut side of the peaches with the melted butter and place them cut-side down on the grill. Grill the peaches for 4-5 minutes, or until they are tender and have grill marks.
  3. In a small bowl, mix together the brown sugar and cinnamon. Sprinkle the mixture over the grilled peaches.
  4. Serve the grilled peaches warm, topped with a scoop of vanilla bean ice cream.

We hope you enjoy this recipe for grilled peaches with vanilla bean ice cream, and we look forward to sharing more delicious recipes with you in the future. Happy grilling!

The Perfect Comfort Food: Chocolate Chip Cookies

Chocolate Chip Cookies Recipe

Welcome back to Tasting Treats, the food and cooking blog that brings you delicious recipes and inspiration for every occasion.

Chocolate Chip Cookies Recipe


Today, we're excited to share with you a recipe for a classic American dessert: chocolate chip cookies. Soft and chewy on the inside, with a slight crunch on the outside, these cookies are sure to satisfy your sweet tooth.

Ingredients:

  • 1 cup unsalted butter, softened
  • 1 cup granulated sugar
  • 1 cup packed brown sugar
  • 2 eggs
  • 1 tsp vanilla extract
  • 2 1/4 cups all-purpose flour
  • 1 tsp baking soda
  • 1 tsp salt
  • 2 cups semisweet chocolate chips

Instructions:

  1. Preheat your oven to 375°F (190°C). Line a baking sheet with parchment paper.
  2. In a large mixing bowl, cream together the butter and sugars until light and fluffy. Add the eggs, one at a time, beating well after each addition. Stir in the vanilla extract.
  3. In a separate bowl, whisk together the flour, baking soda, and salt. Gradually add the dry ingredients to the butter mixture, stirring until just combined. Stir in the chocolate chips.
  4. Drop the dough byrounded tablespoonfuls onto the prepared baking sheet, leaving about 2 inches of space between each cookie. Bake the cookies for 8-10 minutes, or until they are golden brown around the edges.
  5. Remove the cookies from the oven and let them cool on the baking sheet for a few minutes before transferring them to a wire rack to cool completely.

We hope you enjoy this recipe for chocolate chip cookies, and we look forward to sharing more delicious recipes with you in the future. Happy baking!

Rich and Creamy Crème Brûlée: A Classic French Recipe

Crème Brûlée Recipe

Welcome back to Tasting Treats, the food and cooking blog that brings you delicious recipes and inspiration for every occasion.

Crème Brûlée Recipe


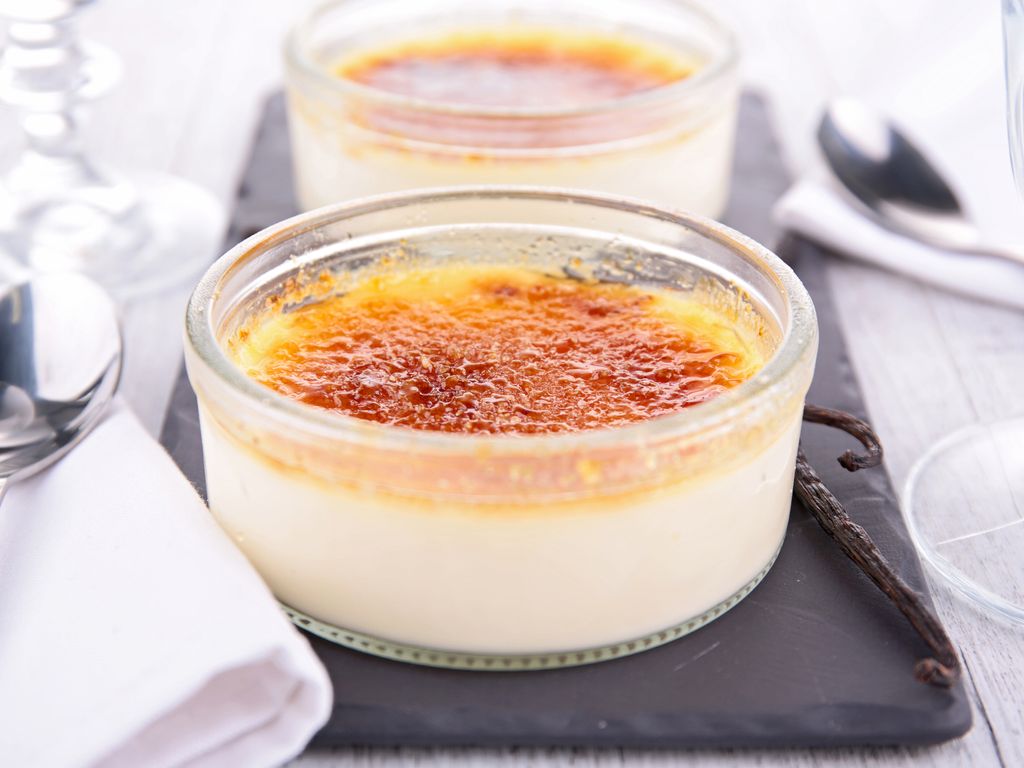
Today, we're excited to share with you a recipe for a classic French dessert: crème brûlée. This rich, creamy custard is topped with a layer of caramelized sugar, making for a truly indulgent treat.

Ingredients:

  • 4 cups heavy cream
  • 1 vanilla bean, split lengthwise
  • 8 egg yolks
  • 1 cup granulated sugar
  • 1/2 cup turbinado sugar (for the caramelized top)

Instructions:

  1. Preheat your oven to 300°F (150°C).
  2. In a small saucepan, heat the heavy cream and the vanilla bean over medium heat until the cream is just about to boil. Remove the pan from the heat and set it aside to cool slightly.
  3. In a large mixing bowl, whisk together the egg yolks and granulated sugar until well combined. Slowly add the warm cream to the egg mixture, whisking constantly to prevent the eggs from cooking.
  4. Strain the mixture through a fine-mesh sieve into a large measuring cup or a pitcher with a spout. Divide the mixture evenly among six 6-ounce ramekins or custard cups.
  5. Place the ramekins in a large baking dish, and pour enough hot water into the dish to come halfway up the sides of the ramekins. Carefully transfer the baking dish to the preheated oven and bake the crème brûlée for 45-50 minutes, or until the custards are set but still slightly jiggly in the center.
  6. Remove the ramekins from the baking dish and let them cool to room temperature. Cover the ramekins with plastic wrap and refrigerate them until they are chilled, at least 2 hours or up to 3 days.
  7. When you are ready to serve the crème brûlée, sprinkle a thin layer of turbinado sugar evenly over the top of each custard. Using a kitchen torch, carefully caramelize the sugar by moving the torch back and forth over the surface of the sugar until it is melted and bubbly. Alternatively, you can caramelize the sugar under the broiler of your oven.
  8. Serve the crème brûlée immediately, garnished with a sprig of mint or a sprinkle of cocoa powder, if desired.

We hope you enjoy this recipe for crème brûlée, and we look forward to sharing more delicious recipes with you in the future. Bon appétit!

A Classic Italian Recipe: Cacio e Pepe

Cacio e Pepe Recipe

Welcome back to Tasting Treats, the food and cooking blog that brings you delicious recipes and inspiration for every occasion.


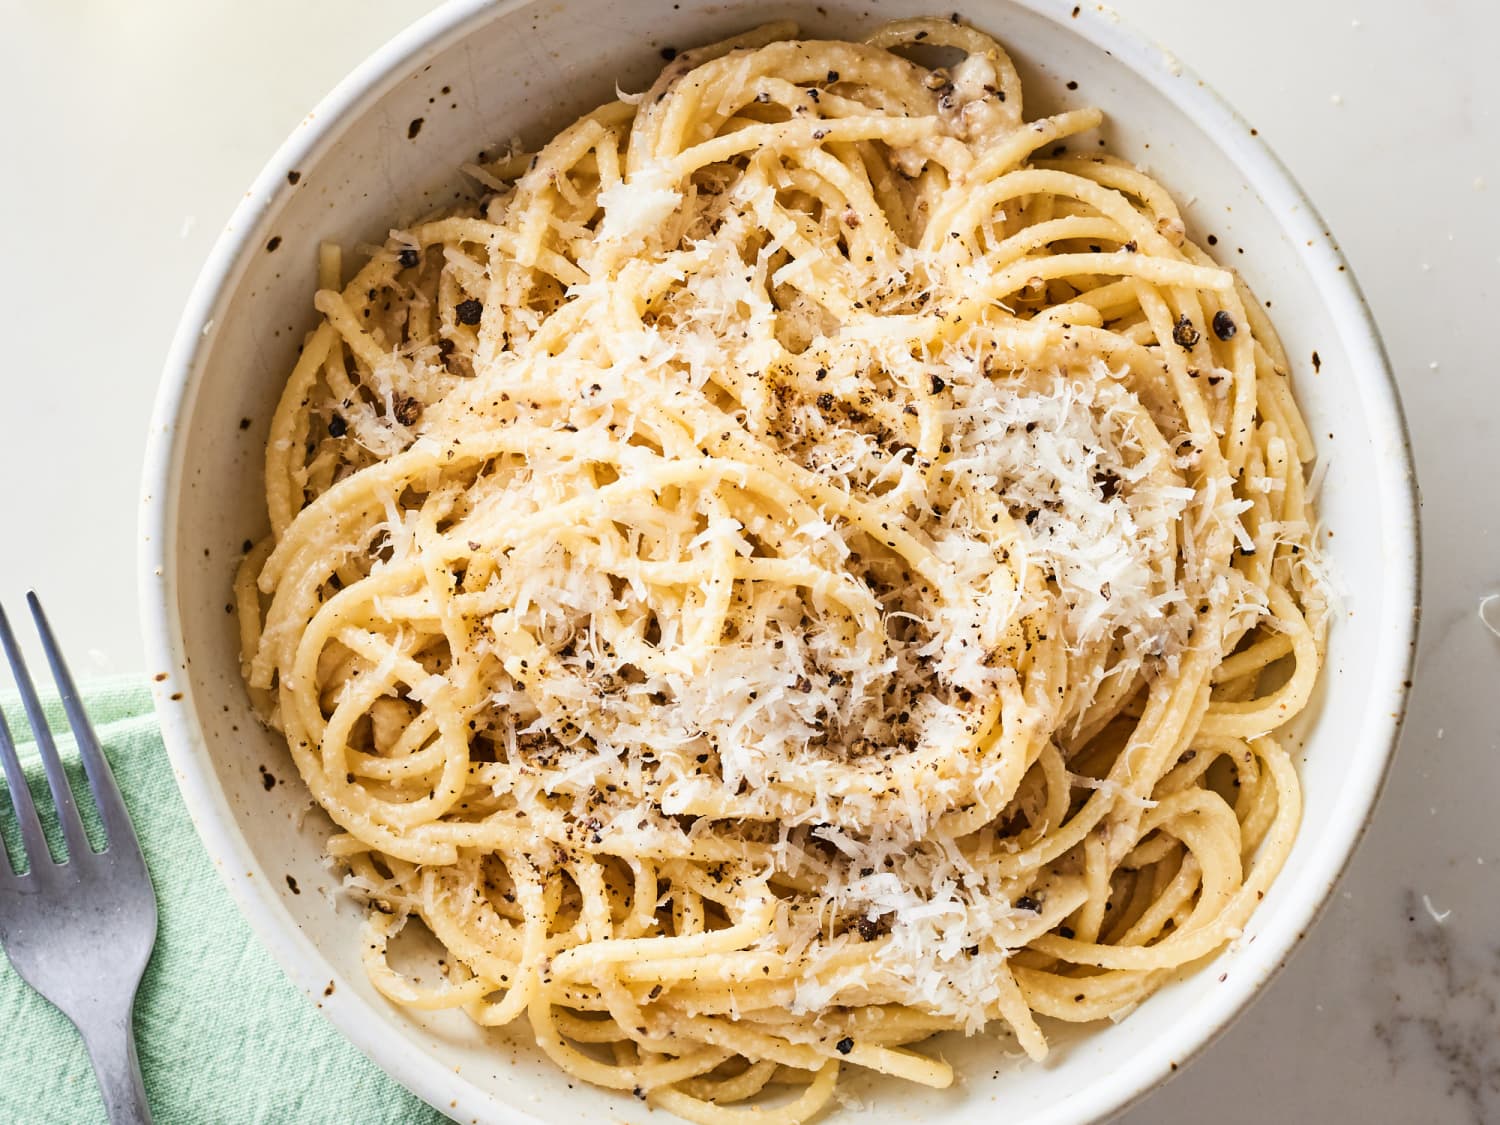
Today, we're excited to share with you a recipe for a classic Italian dish: cacio e pepe. This simple, yet sophisticated pasta dish is made with just a few ingredients, but packs a punch of flavor.

Ingredients:

  • 8 oz pasta (we recommend using spaghetti or bucatini)
  • 1 cup grated Pecorino Romano cheese
  • 1 tsp freshly ground black pepper
  • 2 tbsp unsalted butter
  • Salt to taste

Instructions:

  1. Bring a large pot of salted water to a boil. Add the pasta to the boiling water and cook it according to the package instructions, or until it is al dente.
  2. While the pasta is cooking, melt the butter in a small saucepan over medium heat. Add the pepper and stir to combine.
  3. When the pasta is done cooking, drain it, reserving about 1 cup of the pasta cooking water. Add the pasta to the saucepan with the pepper and butter, and toss to coat the pasta evenly.
  4. Gradually add the grated cheese, stirring constantly, until the cheese has melted and the sauce is smooth and creamy. If the sauce seems too thick, add a little bit of the reserved pasta water to thin it out.
  5. Season the cacio e pepe with salt to taste, and serve it hot. We recommend garnishing the pasta with a sprinkle of extra cheese and a few grinds of black pepper.

This recipe for cacio e pepe is a perfect example of the Italian principle of "less is more." With just a few high-quality ingredients, you can create a dish that is both elegant and comforting. We hope you enjoy this recipe, and we look forward to sharing more delicious recipes with you in the future. Buon appetito!

Fresh Pasta Recipe

Fresh Pasta Recipe

Welcome to Tasting Treats, the food and cooking blog that brings you delicious recipes and inspiration for every occasion.


As our inaugural post, we wanted to share with you one of our all-time favorite recipes: homemade pasta. This recipe is easy to follow, and the results are always impressive. Plus, there's nothing quite like the taste and texture of fresh, homemade pasta.


Ingredients:

  • 2 cups all-purpose flour
  • 3 large eggs
  • 1 tsp salt

Instructions:

  1. Combine the flour and salt in a large mixing bowl. In a separate bowl, beat the eggs until smooth.
  2. Make a well in the center of the flour mixture, and pour the eggs into the well. Using a fork, gradually mix the eggs into the flour until a dough forms.
  3. If the dough is too dry, add a little water, a teaspoon at a time, until the dough comes together. If the dough is too wet, add a little more flour until it reaches the desired consistency.
  4. Once the dough has come together, turn it out onto a lightly floured surface and knead it for 5-10 minutes, or until it is smooth and elastic. Cover the dough with a clean, damp cloth and let it rest for at least 30 minutes.
  5. After the dough has rested, roll it out on a lightly floured surface until it is about 1/8-inch thick. Using a sharp knife or a pasta cutter, cut the dough into long, thin strips. Hang the pasta strips over a clean, dry broom handle or a pasta drying rack to dry for at least an hour before cooking.
  6. To cook the pasta, bring a large pot of salted water to a boil. Gently add the pasta to the boiling water and cook for 2-3 minutes, or until it is al dente. Drain the pasta and serve it with your favorite sauce.

We hope you enjoy this recipe for homemade pasta, and we look forward to sharing more delicious recipes with you in the future. Happy cooking!